Navigating Email Standards in 2025: 3 Essential Steps for cPanel Setup for Google and Yahoo Email Authentication
In 2025, ensuring your emails are properly authenticated for Google and Yahoo is crucial. Our latest guide outlines 3 essential steps to configure your cPanel for optimal email deliverability and security. Dive into the specifics of SPF, DKIM, and DMARC settings to keep your email communications smooth and secure.
Share on
Urgent Update for All Email Users: Starting February 2024, Google and Yahoo will block all unauthenticated emails. Is your email account prepared for the new email authentication standards?
Table of Contents
ToggleSPF / DKIM / DMARC Best Practices 2025
Imagine you’re the postmaster of the Internet world, where your job is to deliver emails across a vast, intricate network. In this world, your primary mission is to ensure that each email reaches its destination safely and efficiently. But in 2024, the rules of the road changed. Google and Yahoo the highway patrol of the email universe, have set new standards. These standards aren’t just best practices anymore; they’re mandatory for ensuring your emails aren’t lost or, worse, end up in the dreaded spam folder.
In this article, we’ll explain these new authentication standards, focusing on how they can help you reduce spoofing and phishing, build and maintain a good online reputation, and significantly increase the deliverability of your emails.
We’ll use your cPanel control panel, to ensure your emails comply with these new rules and are secure and reliable. Whether you’re a business owner, a marketer, or someone who relies heavily on email communication, this how-to guide is your roadmap to understanding and implementing these required changes.
Understanding the New Email Authentication Rules of the Road
Email authentication in 2025 is no longer just an optional pit stop; it’s now a mandatory checkpoint. This section of our journey will explore the essentials of SPF, DKIM, and DMARC, the three pillars of email authentication.
| Protects Who? | Actions Required: | |
| SPF | Sending and receiving mail servers | Test your email account. Update your email SPF record settings if needed (explained below) |
| DKIM | Sending <-> receiving authentication | Set your DKIM records (explained below) |
| DMARC | Your domain, by preventing spoofing (i.e., sending as your domain name) | Check, then Set your DMARC policy settings |
- SPF (Sender Policy Framework): SPF is your domain’s guest list. It specifies which mail servers can send emails on your domain’s behalf. When an email arrives at its destination, the receiving server checks this list. If the server sending the email isn’t on your list, the message could be marked as spam or rejected. It’s like having a bouncer at the door of a club, ensuring only those on the list get in.
- DKIM (DomainKeys Identified Mail): DKIM adds a digital signature to your emails, somewhat like a seal of authenticity. This signature is verified against a public cryptographic key in your domain’s DNS records. It’s like adding a wax seal to a letter; it assures the recipient that the message hasn’t been tampered with during its journey.
- DMARC (Domain-based Message Authentication, Reporting, and Conformance): Think of DMARC as your email highway patrol officer. It uses SPF and DKIM to verify that the sender of an email is legitimate. It’s like a checkpoint that ensures every email from your domain is authentic. More importantly, DMARC provides feedback on your emails’ performance, letting you know if they’re reaching their intended destination or getting sidetracked.
Key Point: Understanding these standards has become a requirement. DMARC, SPF, and DKIM are the building blocks of a robust email delivery strategy, ensuring your emails are trusted, delivered, and read. Now, let’s move on to the “how.”
Your cPanel GPS – Navigating to Compliance
Now that we understand the importance of SPF, DKIM, and DMARC, let’s get hands-on. Think of your cPanel as the GPS in your car, guiding you through the various routes and turns to reach your destination—in this case, email compliance and security. Here’s how you can set up each of these standards in cPanel:
 SPF (Sender Policy Framework) Setup

- The Basics: First, log into your cPanel account. In the “Email” section, look for “Email Deliverability.”
- Enabling SPF: If SPF is not enabled, you may see a “problems exists” error. Click the “Manage” button to review the settings. Clicking the button on that page will “Install the Suggested Record” adding the SPF record to your domain’s DNS settings.
- If you’re using a DNS server other than ours, you’ll need to add the suggested TXT record to your DNS provider’s settings. If you’re not familiar with how to do this, please reach out to your DNS provider for assistance.
- Customizing SPF: You might need to customize the SPF record, especially if you use third-party email services (like newsletter services). To do this, click on “Customize” under the SPF record. Here, you can add your email senders” IP addresses or domain names.
 DKIM (DomainKeys Identified Mail) Configuration
- When configuring DKIM, go to the “Email Deliverability” section as you did for SPF and locate the DKIM section. The setup process mirrors the SPF setup process described above.
- Activating DKIM: Enabling DKIM will generate a unique key that you’ll add to your DNS records. This key is like a digital fingerprint, ensuring your emails are recognized and trusted.
- And if you are using a DNS server that is not ours, you need to add the recommended TXT record to your DNS provider’s settings, just like you did with your SPFrecord. If you are not familiar with how to do this, please contact your DNS provider for assistance.
 DMARC (Domain-based Message Authentication, Reporting, and Conformance) Implementation
- Understanding DMARC: DMARC uses SPF and DKIM to verify your emails. It also lets you specify how receivers should handle emails that don’t pass these checks.
- Creating a DMARC Record: Unlike the simple SPF and DKIM setup page noted above, manually adding a DMARC record into your cPanel -> Zone Editor is required.
- To do so, jump back into your cPanel, navigate to the “Zone Editor” section, and click the “Manage” button to the right of your domain. Scroll down to verify whether your DMARC record is already set.
- Setting DMARC Values: If DMARC is not set, click “+ Add Record” and then “Add DMARC Record.”

- If you just wish to pass the test and have no interest in receiving aggregate reports or rejecting or quarantining emails based on DMARC authentication, click “Save Record” to complete the setup.
- Important. Setting a quarantine or reject value will help prevent fraudsters from spoofing the domain. Not setting a quarantine or reject value is just fine. You just don’t get the anti-spoofing advantages.
What are the Big Three DMARC Policies: p=???
Below is text you may copy/paste into your DMARC record text entry box to cover the most basic DMARC requirements:
v=DMARC1; p=quarantine; sp=none; adkim=r; aspf=r; pct=100; fo=0; rf=afrf; ri=86400
- Ease into Monitoring with p=none: In our example DMARC record above, we chose the quarantine policy (p=quarantine). You could instead choose “none” (p=none). This first step is like taking a leisurely drive around your neighborhood. With DMARC set to ‘none’, you’re simply observing who’s using your email address. It’s a calm and non-confrontational way to begin, perfect for those just getting familiar with DMARC.
- Transition to Quarantine with p=quarantine: Moving to this phase is like choosing a more scenic, peaceful route. By setting the policy to ‘quarantine’, you’re gently redirecting suspicious emails to a safer place—the spam folder. It’s like avoiding the bustle of traffic for a more serene journey. You have the flexibility to adjust how much mail takes this detour, ensuring a pleasant trip for your valid emails.
- Arrive with Reject with p=reject: This final step will help you reach your destination with confidence. Setting your DMARC to ‘reject’ means ensuring that only trusted emails make it to your inbox. It’s akin to having a reliable co-pilot guide you away from unwanted detours and toward your desired endpoint—a safe and secure inbox.
- Now that you better understand the policy options, the easiest way that we’ve found to generate DMARC record policies for a domain name is the form on EasyDMARC’s website: DMARC Record Generator.
Troubleshooting and Tips
- Check Regularly: Just as you would check your car’s GPS for updates, periodically review your cPanel settings to ensure all is well.
- Test Your Setup: Use email authentication testing tools like Learn and Test DMARC, MXToolbox or EasyDMARC to ensure your settings are set (without errors).
- Seek Help if Needed: If you’re unsure about any step, don’t hesitate to ask for help. Remember, understanding and navigating cPanel is a skill that improves with practice and experience.
By following these steps, you’re not just complying with the new email standards; you’re also ensuring that your emails are trustworthy and have a greater chance of reaching your audience. Now, onto our next section, where we’ll focus on maintaining and optimizing the email authentication setup for long-term success.
Ensuring a Smooth Email Journey
Now that your email vehicle is equipped with the latest authentication tools (SPF, DKIM, and DMARC), it’s time to ensure that your email authentication journey remains smooth and your messages reach their intended destinations without any speed bumps or roadblocks.
Regular Monitoring and Adjustments
- Check Your Email Health: Regularly monitor your email deliverability. Keep an eye on the reports generated by DMARC and look for any delivery issues (discussed further below).
- Because Gmail now requires senders keep their spam complaint rate below 0.3%, consider registering your domain name with Google’s Postmaster Tools. Once set, you’ll be able to see aggregated spam report information within your Google Postmaster account.
- Update as Needed: If you change email service providers or add new tools that send emails on your behalf, remember to update your SPF and DKIM settings accordingly.
Engaging with Feedback Reports
- Understanding DMARC Reports: DMARC sends reports that give insights into your email’s performance. These reports can be technical, but they’re valuable for understanding issues like spoofing or phishing attempts.
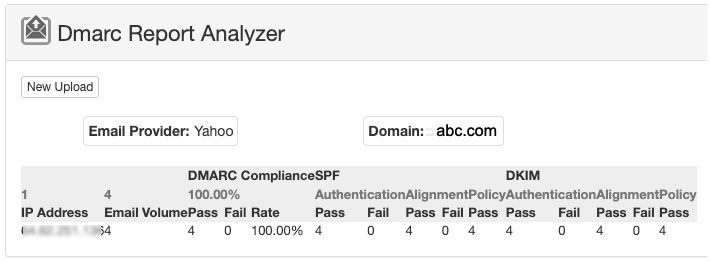
- To receive aggregate mail or failure reports, choose the “Optional Parameters” option before clicking the “Save Record” button, as noted in step #3 above. Below is an example of a report that shows Yahoo received (4) messages from abc.com, and all were received without fail (they passed!).

- Acting on the Data: Use these reports to tweak your email authentication settings. If you’re getting a lot of failures, it might be time to investigate and rectify any configuration issues.
Educating Your Team
- Awareness is Key: Make sure your team is aware of the importance of these email standards. A simple mistake in configuration can lead to emails not being delivered.
- Regular Training: Offer training sessions or resources to keep everyone up-to-date on the best practices and latest changes in email authentication. Google provides helpful resources relating to email sender guidelines on their website as well.
Troubleshooting Delivery Issues
- Be Proactive: If you notice delivery issues, investigate immediately. Check your cPanel settings, ensure your domain isn’t blacklisted, and be sure to take advantage of the troubleshooting tips noted above.
- Seek Expert Help: Don’t hesitate to ask for help if you’re unable to resolve delivery issues. Sometimes an external perspective can quickly identify and solve the problem.
Final Words of Encouragement
Whether you are a business owner, an email marketer, or someone who depends on email for communication, these email authentication tips will be helpful in managing your online business. You’ve got this!
Do you Have Website Hosting Services with TVCNet?
If so, all of the above services are FREE of charge!


