Secure Your Site: Tips for setting up Two Factor Authentication (TFA) using Wordfence
Elevate your site’s security with our guide on setting up TFA using Wordfence.
Share on
Table of Contents
ToggleIf you are hoping to better secure your WordPress website, there is no better second step than configuring Two-Factor Authentication (2FA)
Two-factor authentication (2FA), sometimes called two-step verification or dual-factor authentication, is a great way to better secure your login page against would-be hackers. In this article, we will discuss how to set up 2FA within WordPress through the Wordfence plugin.
Step 1: Click the Login Security Settings Link
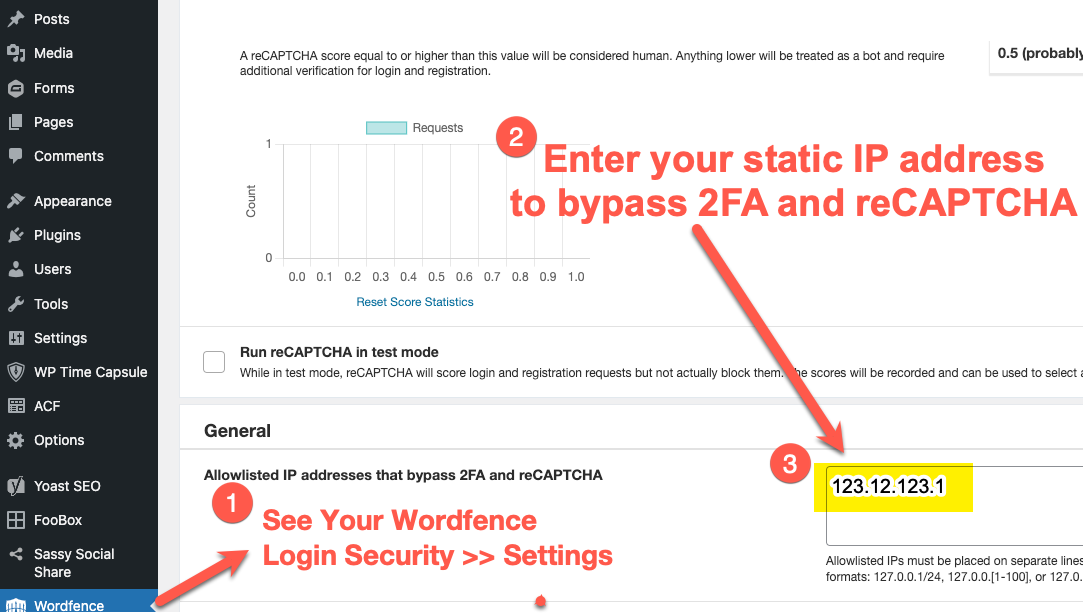
Once you’ve installed the Wordfence plugin within your WordPress website, be sure to jump down to the “Login Security” settings linked below the Wordfence link on the left-hand side menu of your WordPress dashboard.
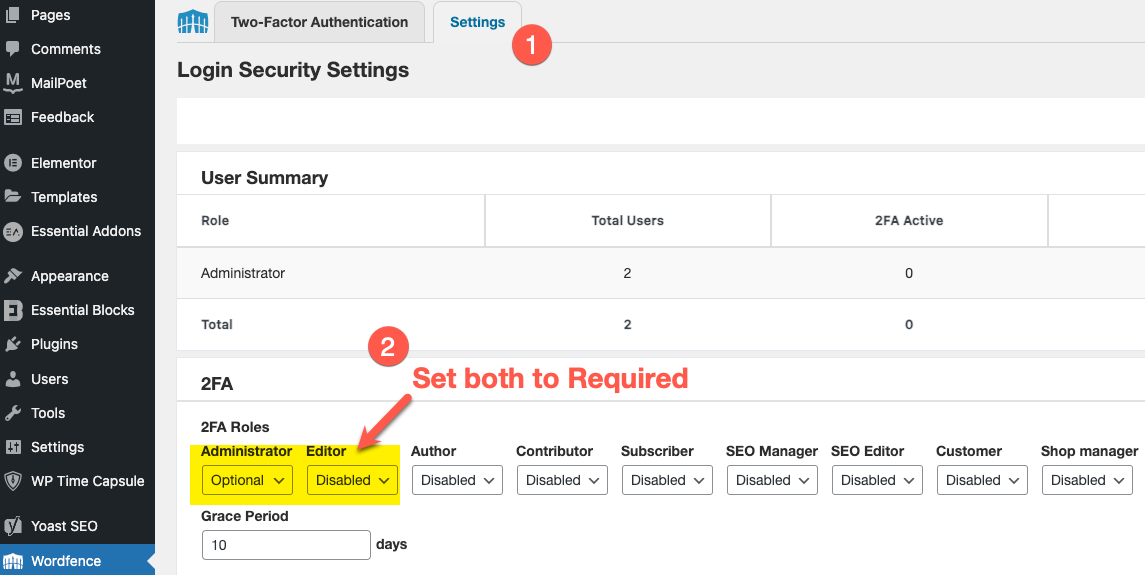
Step 2: Enable 2FA for User Roles
- In “Login Security” -> “Settings,” you’ll find options to enable 2FA for different user roles within WordPress. Set “Required” for both the Administrator and Editor roles, then click “Save.”

Step 3: Set Up 2FA on Your Device
- You’ll need an authenticator app on your smartphone or tablet. I personally recommend using the Google Authenticator app. Wordfence likewise supports most TOTP (time-based one-time password) authenticator apps, including Authy, FreeOTP, LastPass Authenticator, Duo Mobile, and Microsoft Authenticator.
- Once you have your authenticator app installed, open the authenticator app and add a new account.
- You can usually do this by tapping a plus sign symbol or a tiny QR code symbol within the app.
Step 4: Scan the QR Code or Enter the Key Manually
- Jump back to the Wordfence “Login Security” page. There you’ll see a large QR code in the middle of the page.
- Use your authenticator app to scan this QR code.
- Alternatively, you can manually enter the 32-character key shown below the QR code into your authenticator app.
- Your authenticator app will now display a 6-digit code that changes every 30 seconds. This rotating code is the magic of 2FA.
Step 5: Activate 2FA and Download Your Backup Codes
- Start by entering the 6-digit code from your authenticator app into the Wordfence settings to activate 2FA.
- Be sure to download the backup codes provided by Wordfence.
- These codes are crucial for accessing your account if you lose your authenticating device or cannot access the authenticator app for any reason. Each backup code can only be used once, and you’ll get five of them.
Step 6: Test Your Login
- Log out of WordPress. Then, try logging in once again.
Bonus 2FA Setup Tip
While 2FA is a great way to better secure your login page, I think everyone agrees that the extra steps required to log in may take a bit of getting used to. That said, if your IP address rarely changes, you can bypass 2FA altogether by choosing to use the Allowlisting IP option you’ll find at the bottom of the “Login Security” -> “Settings” page.


